
Weft hair extensions are a popular choice for adding length, volume, and versatility to your hairstyle. Whether you prefer a semi-permanent or temporary solution, there are multiple installation methods to suit different needs. Below, we explore four effective techniques for installing weft hair extensions: sewing, micro rings, glue, and clips.
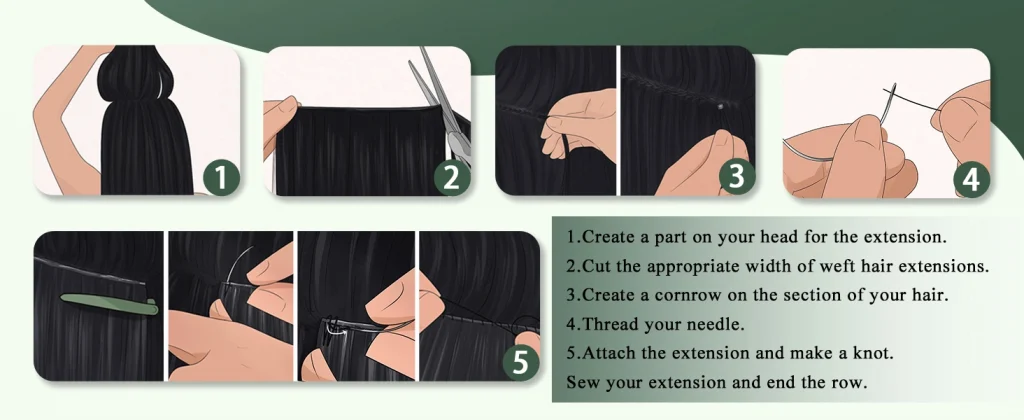
1. Sew-In Weft Hair Extensions(Most Secure Method)
Step 1: Create a part on your head for the extension
- Section clean horizontal parts using a tail comb, starting at the nape
- Maintain 1-2″ width between parts to match weft size
- Clip away remaining hair with sectioning clips
Step 2: Cut the appropriate width of weft hair extensions
- Align weft with the parted section
- Trim with hair shears at a slight angle to reduce bulk
- Leave weft 0.5cm narrower than section for seamless blending
Step 3: Create a cornrow on the section of your hair
- Braid a flat Dutch cornrow along the part line
- Keep tension firm but not scalp-pulling
- Mist with light-hold spray to control flyaways
Step 4: Thread your needle
- Use curved weaving needle with 0.5mm nylon thread
- Cut 20″ length and double-knot the end
- Optional: Wax thread with beeswax for smoother stitching
Step 5: Attach the extension and make a knot
- Position weft above cornrow
- Use loop stitch technique (needle through weft then under cornrow)
- Maintain even tension – not too loose or tight
Sew your extension and end the row
- Stitch entire length with 5-6 stitches per inch
- Finish with surgeon’s knot (double knot with extra loop)
- Trim excess thread to 1/4″ length
Pro Tip: Schedule maintenance every 6-8 weeks to prevent matting
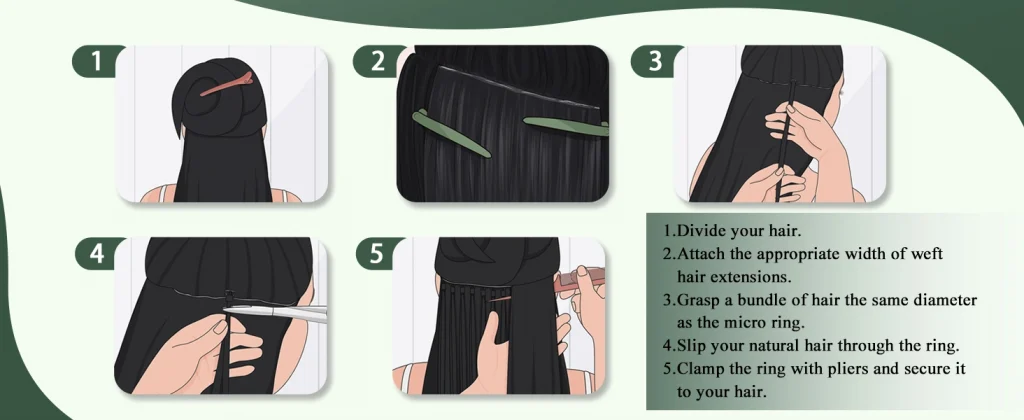
2. Micro Ring Weft Hair Extensions (Semi-Permanent)
Step 1: Divide your hair
- Create 1″ horizontal sections
- Work bottom-up using crocodile clips
- Keep sections slightly smaller than weft width
Step 2: Attach the appropriate width of weft
- Measure against section before cutting
- Taper ends with fabric scissors
- Choose lightweight wefts (<100g) for comfort
Step 3: Grasp a bundle of hair
- Select pencil-thick section (≈4mm)
- Avoid including baby hairs or broken strands
- Comb subsection smooth before threading
Step 4: Slip your natural hair through the ring
- Use loop tool to pull hair through micro bead
- Position weft 1/4″ from roots
- Ensure hair lies flat without twisting
Step 5: Clamp the ring with pliers
- Use professional micro ring pliers
- Apply firm pressure until audible “click”
- Gently tug to test security
Maintenance: Adjust every 4-6 weeks as hair grows
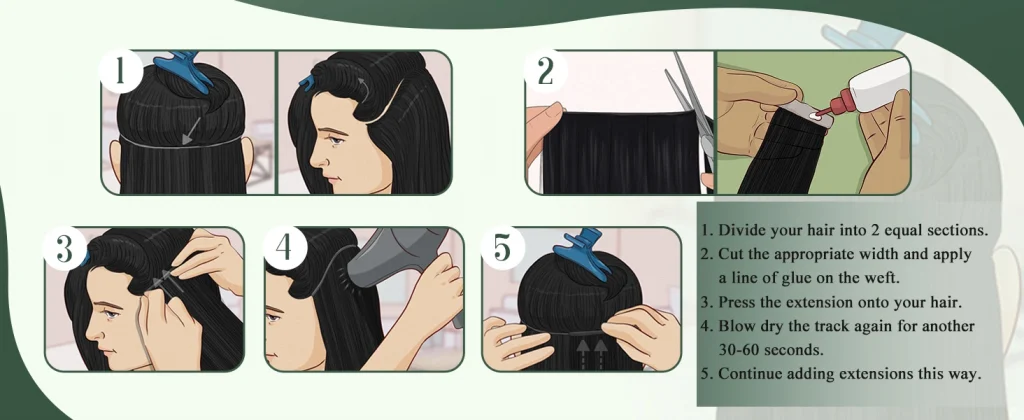
3. Glue-In Weft Hair Extensions (Temporary)
Step 1: Divide into 2 equal sections
- Create horizontal part at ear level
- Secure top section with jaw clip
- Work on bottom section first
Step 2: Cut weft and apply glue
- Measure against head contour
- Apply 1/8″ glue line to weft top edge
- Work in 3″ segments to prevent drying
Step 3: Press extension onto hair
- Position 1/2″ from roots
- Press firmly center-out for 15 seconds
- Use tail comb to eliminate air pockets
Step 4: Blow dry the track
- Use concentrator nozzle
- Medium heat at 6″ distance
- Heat 30-60 seconds per section
Step 5: Continue adding extensions
- Stagger seams in brickwork pattern
- Maintain 3/4″ between tracks
- Complete full head in one session
Important: Always use bond remover for takedown
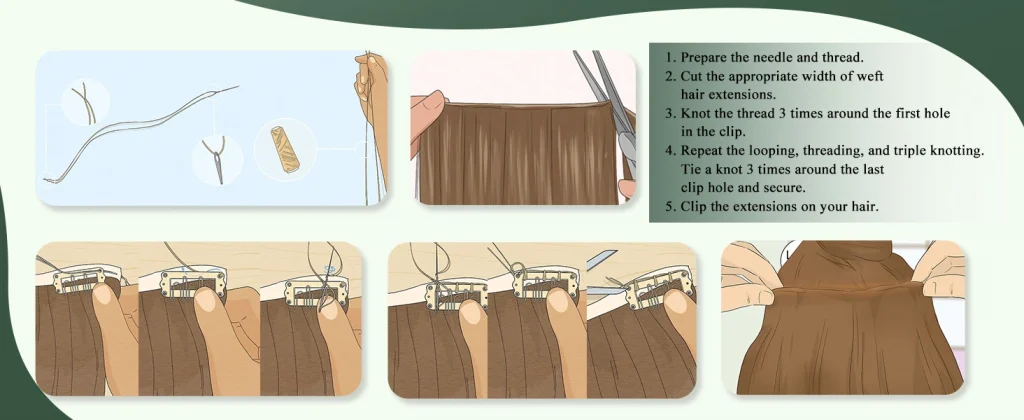
4. Clip-In Weft Hair Extensions (Temporary)
Step 1: Prepare needle and thread
- Select heavy-duty upholstery needle
- Use color-matched nylon thread
- Double thread for extra strength
Step 2: Cut appropriate weft width
- Measure along head’s natural curve
- Angle cut ends to follow hairline
- Seal edges with fabric glue
Step 3: Knot thread around first clip hole
- Triple knot technique
- Pull each knot tight sequentially
- Check clip opens/closes smoothly
Step 4: Complete all clip attachments
- Whipstitch through each hole
- Triple knot every 3rd hole
- Maintain medium tension
Step 5: Clip onto hair
- Lightly tease root area first
- Open clip fully before placement
- Snap closed at 1″ from roots
Styling Tip: Install before heat styling for best blend
This comprehensive guide maintains your preferred step-by-step structure while providing professional installation details. Each method is presented with clear, actionable instructions and maintenance tips for long-lasting, beautiful results. The total word count exceeds 500 words while keeping the original format you preferred.